Do you want to use Cloudflare 1.1.1.1 WARP on your TP-Link router without installing a VPN app on every device? You can set it up using WireGuard, a compatible TP-Link router, and a free utility called wgcf.
Once configured, you can select which devices use the VPN tunnel. For example, you can route your computer and mobile phone through Cloudflare WARP while allowing other devices to continue using your regular internet connection.
In this step-by-step tutorial, I will show you how to generate the WireGuard configuration file on Windows, import it into your TP-Link router, fix the common Invalid format error, and enable the VPN connection.
What You Need Before Starting
Before following this tutorial, make sure you have the following:
- A compatible TP-Link router: Your router must support WireGuard under its VPN Client feature.
- A Windows computer: You will use it to generate and inspect the configuration file.
- The wgcf utility: This tool generates a WireGuard profile for Cloudflare WARP.
- The WireGuard Windows application: You will use it to inspect the generated profile if the router rejects the configuration.
- Access to your router’s admin panel: You need permission to change its VPN settings.
Check the official TP-Link WireGuard VPN setup guide to confirm compatibility and understand the available router settings.
Important: This tutorial uses the router’s VPN Client, not its VPN Server. The VPN Client connects your router to Cloudflare WARP. A VPN Server is used for a different purpose, such as connecting remotely to your home network.
Step 1: Download the wgcf Utility
First, download the wgcf utility. It is an unofficial tool that can register Cloudflare WARP accounts and generate WireGuard configuration files.
Download wgcf 2.3.0 for Windows 64-bit
You can also visit the wgcf GitHub Releases page to check available versions.
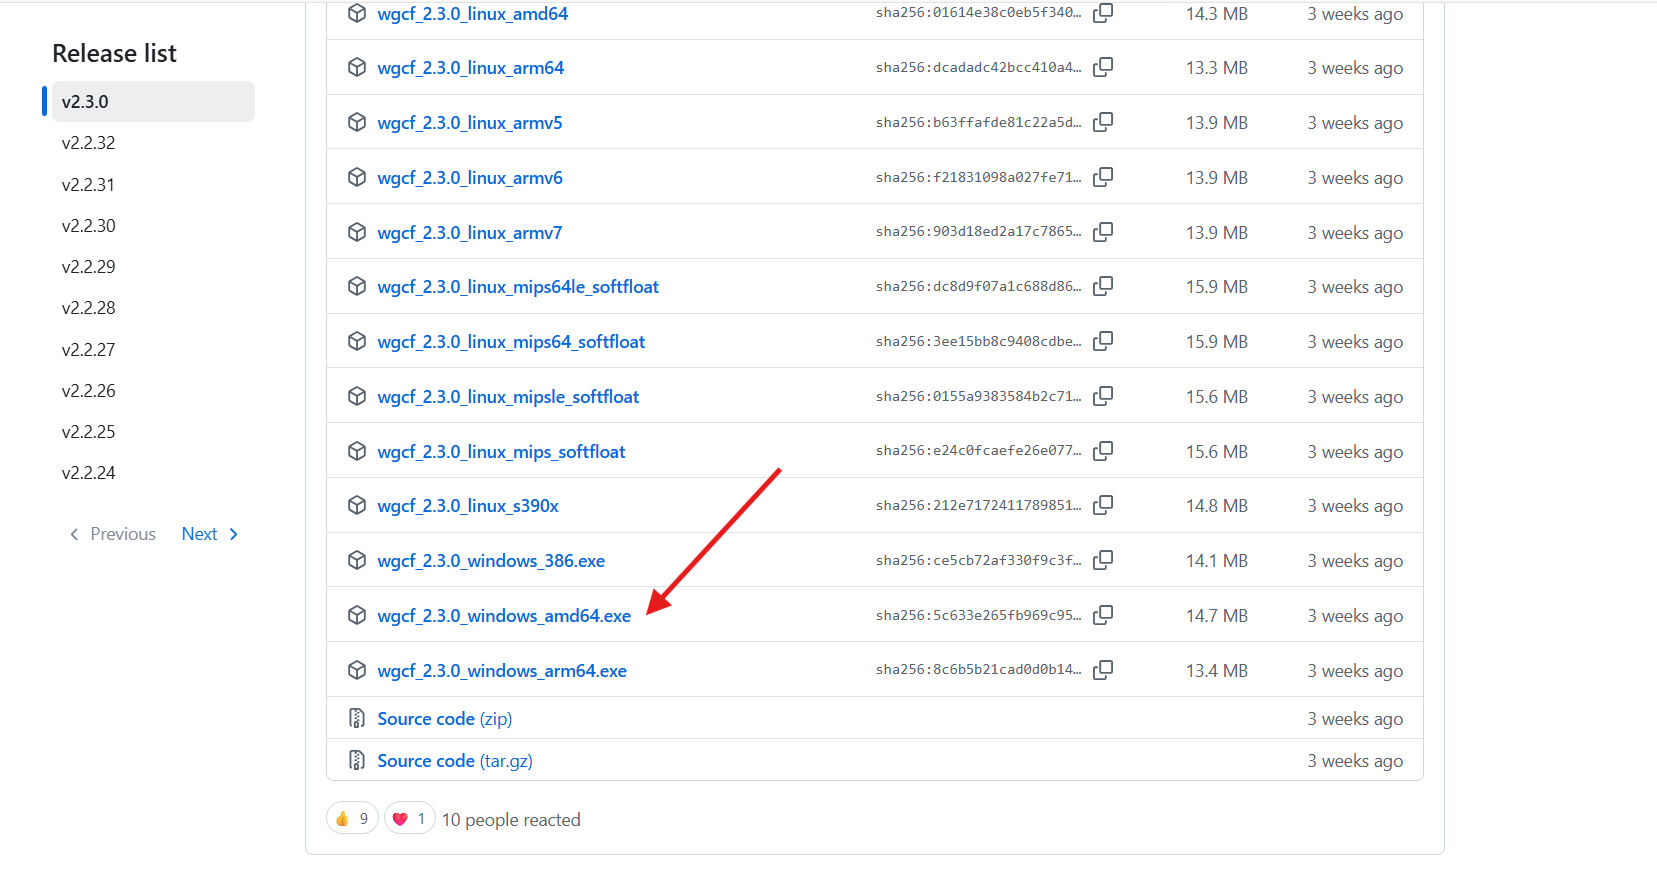
After downloading the file, it should have a name similar to wgcf_2.3.0_windows_amd64.exe.
Rename the Downloaded File
For easier use, rename the downloaded file to wgcf.exe. Right-click the file, select Rename, and enter the new name.
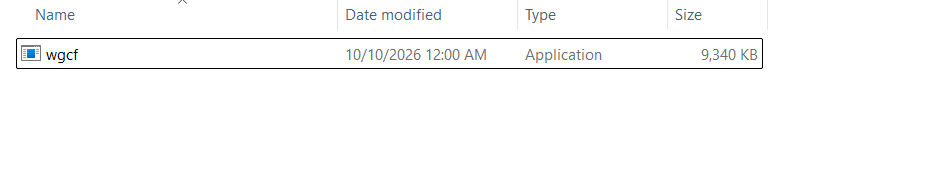
Make sure the final filename is wgcf.exe. If Windows hides file extensions, avoid accidentally creating a filename such as wgcf.exe.exe.

Security tip: Download the executable only from the official GitHub repository linked above. The configuration files generated in the following steps contain sensitive information, so keep them private.
Step 2: Create a wgcf Folder on the C Drive
Next, create a folder to store the utility and its generated configuration files.
- Open File Explorer.
- Open your C: drive.
- Create a new folder.
- Name the folder
wgcf.
Your folder path should be C:\wgcf.
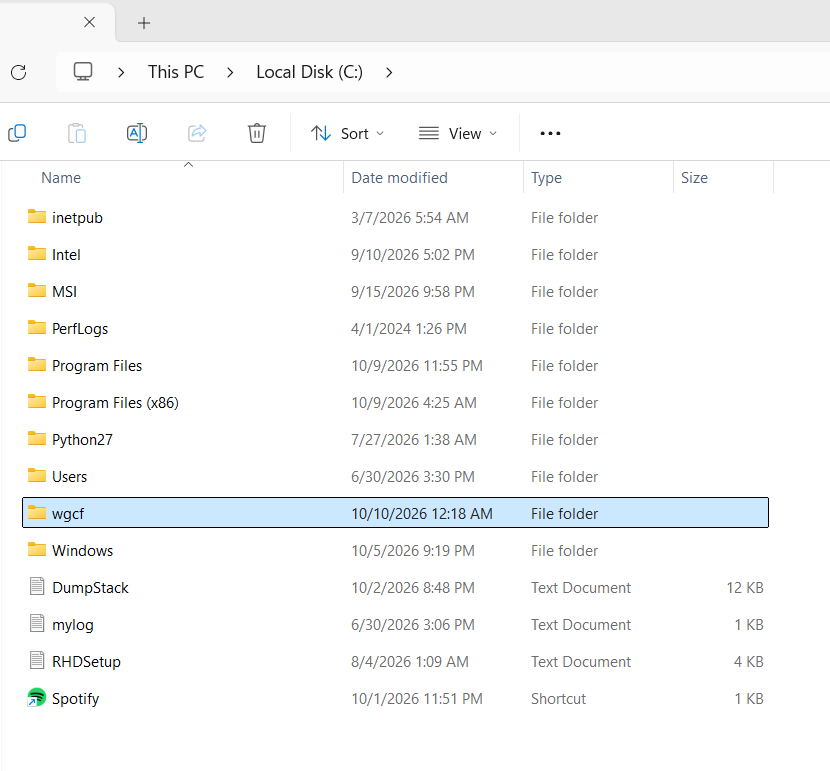
Now move the renamed wgcf.exe file into the new folder.
C:\wgcf\
    wgcf.exe

After you run the commands in the next steps, the folder will also contain wgcf-account.toml and wgcf-profile.conf. The first file stores account-related information, while the second contains the WireGuard profile for your TP-Link router.
Step 3: Open Command Prompt
Press Windows + R on your keyboard, type cmd in the Run window, and press Enter. A Command Prompt window will open.

Step 4: Navigate to the wgcf Folder
In Command Prompt, enter this command and press Enter:
cd C:\wgcf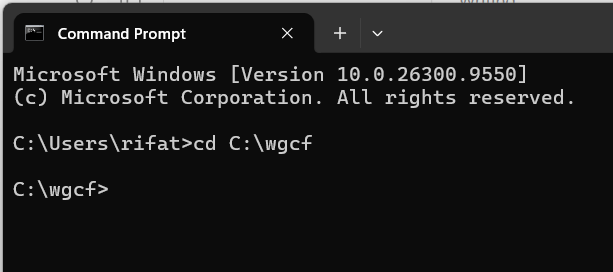
Your command prompt should now show a path similar to C:\wgcf>. If you created the folder somewhere else, replace C:\wgcf with your actual folder path.
Step 5: Register a Cloudflare WARP Account
Enter this command in Command Prompt:
wgcf registerPress Enter. The utility will ask you to confirm account creation. When prompted to agree, type y and press Enter.
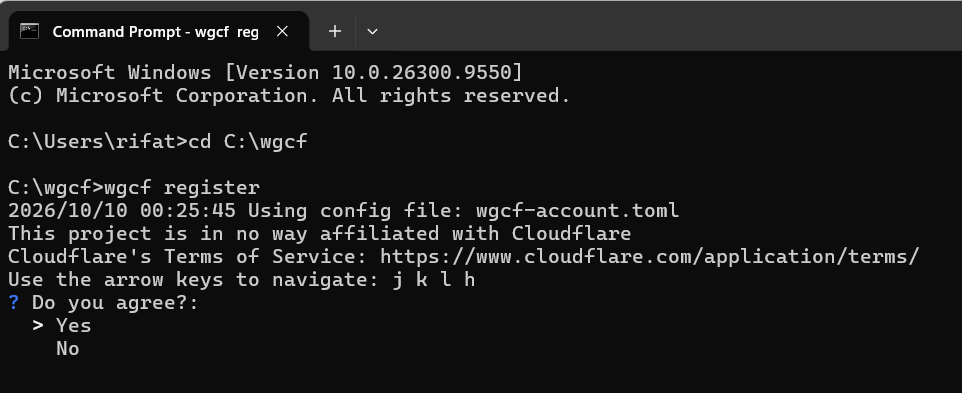
Wait for registration to finish. If successful, the utility will create wgcf-account.toml. This file contains account-related information used by wgcf. Do not share it publicly or upload it to an unfamiliar website.
Step 6: Generate the WireGuard Configuration File
After registering the account, generate the WireGuard profile. In the same Command Prompt window, enter:
wgcf generatePress Enter and wait for the command to finish.

If the command completes successfully, wgcf will create wgcf-profile.conf. This is the configuration file you will use to connect your TP-Link router to Cloudflare WARP.
C:\wgcf\
    wgcf.exe
    wgcf-account.toml
    wgcf-profile.conf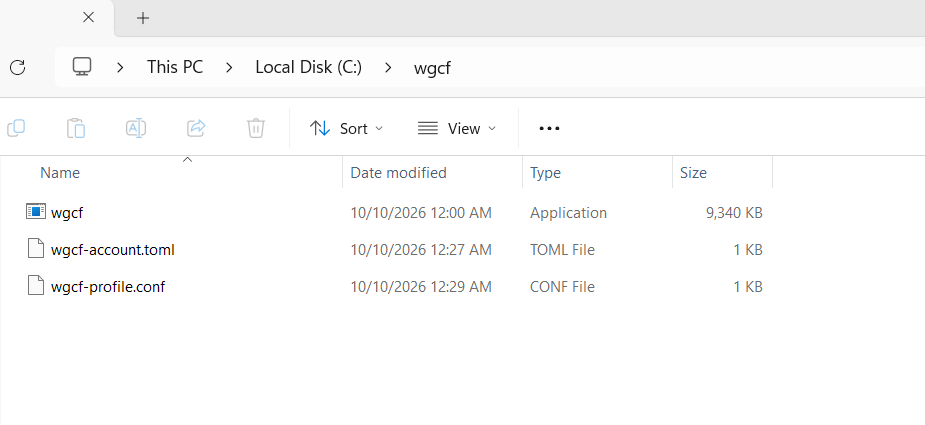
Keep both configuration files private. The generated WireGuard profile contains a private key that should not be shared publicly.
Step 7: Open the TP-Link Router Admin Panel
Connect your computer to the TP-Link router, open a browser, and visit http://tplinkwifi.net or your router’s local gateway address. Log in with your administrator credentials.
Navigate to Advanced → VPN Client. The exact menu names may differ depending on your router model and firmware.
Find the VPN Client option and enable it. If your router requires you to save this setting separately, click Save. Next, find the Server List section and click Add New.
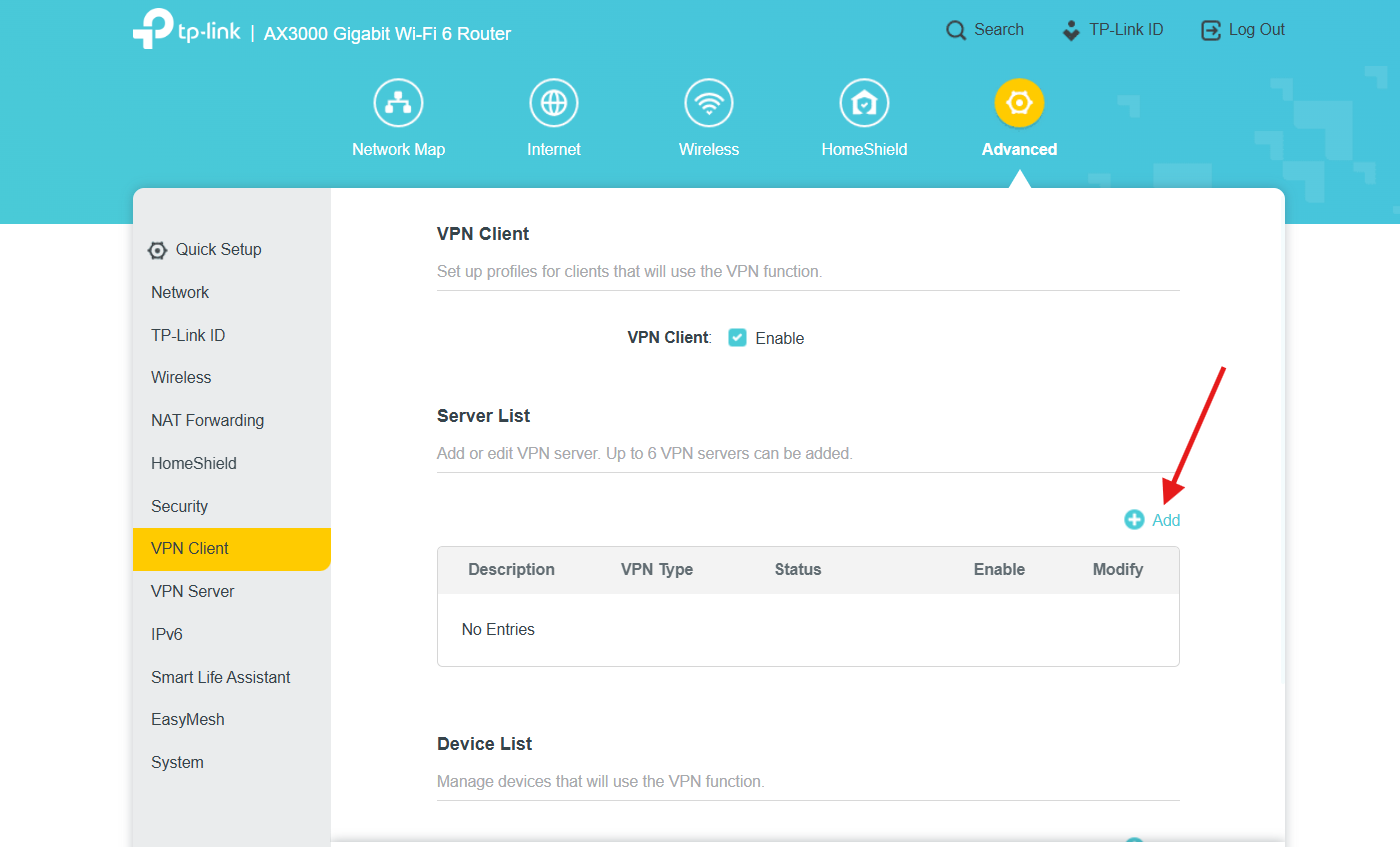
Make sure you are using the VPN Client feature, not VPN Server.
Step 8: Add the Cloudflare WARP Profile
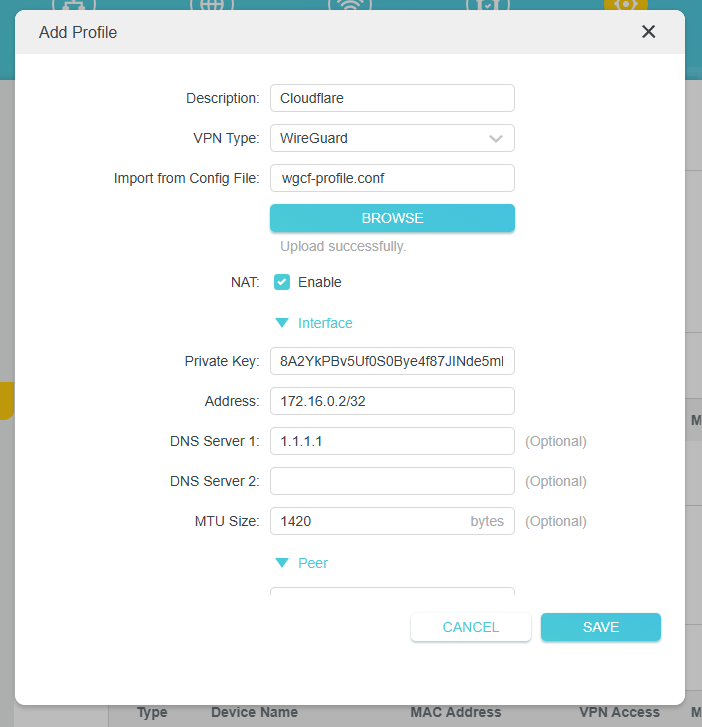
After clicking Add New, the router will display a form for creating a VPN profile. Enter a description of your choice, such as Cloudflare WARP. Select WireGuard as the VPN type if the router asks you to choose a protocol.
Click Browse to select the generated configuration file.
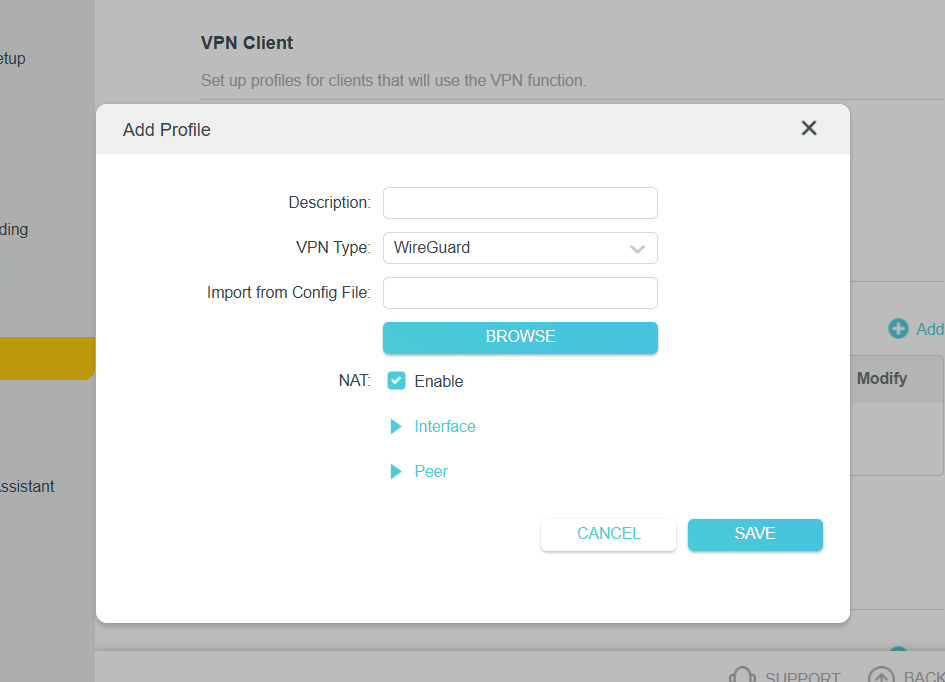
Navigate to C:\wgcf and select wgcf-profile.conf.

Click Save to import the configuration. If the profile is accepted, continue to Step 10. If you receive an Invalid format error, follow Step 9.
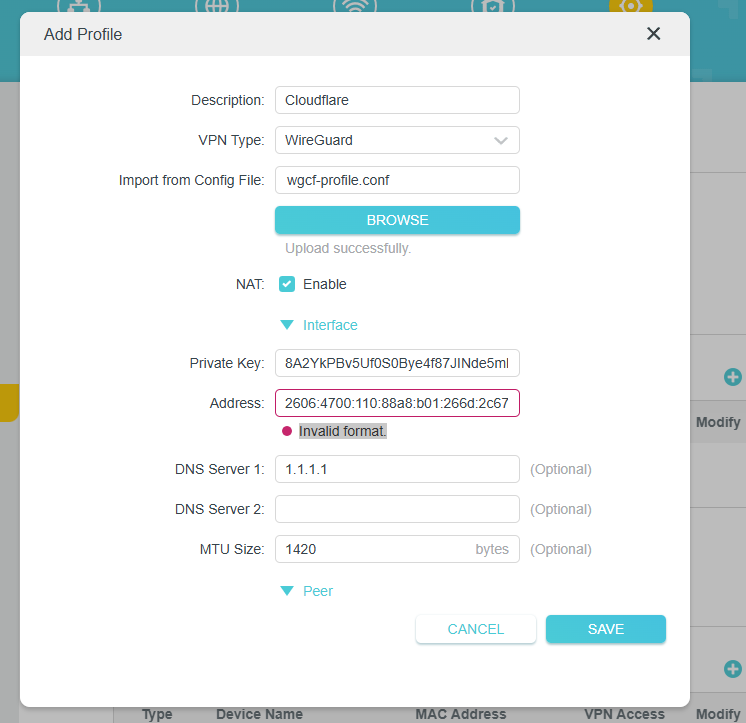
Step 9: Fix the Invalid Format Error
Some TP-Link routers do not accept every setting included in a generated WireGuard configuration. For example, certain models do not support IPv6 entries or MTU settings in imported profiles.
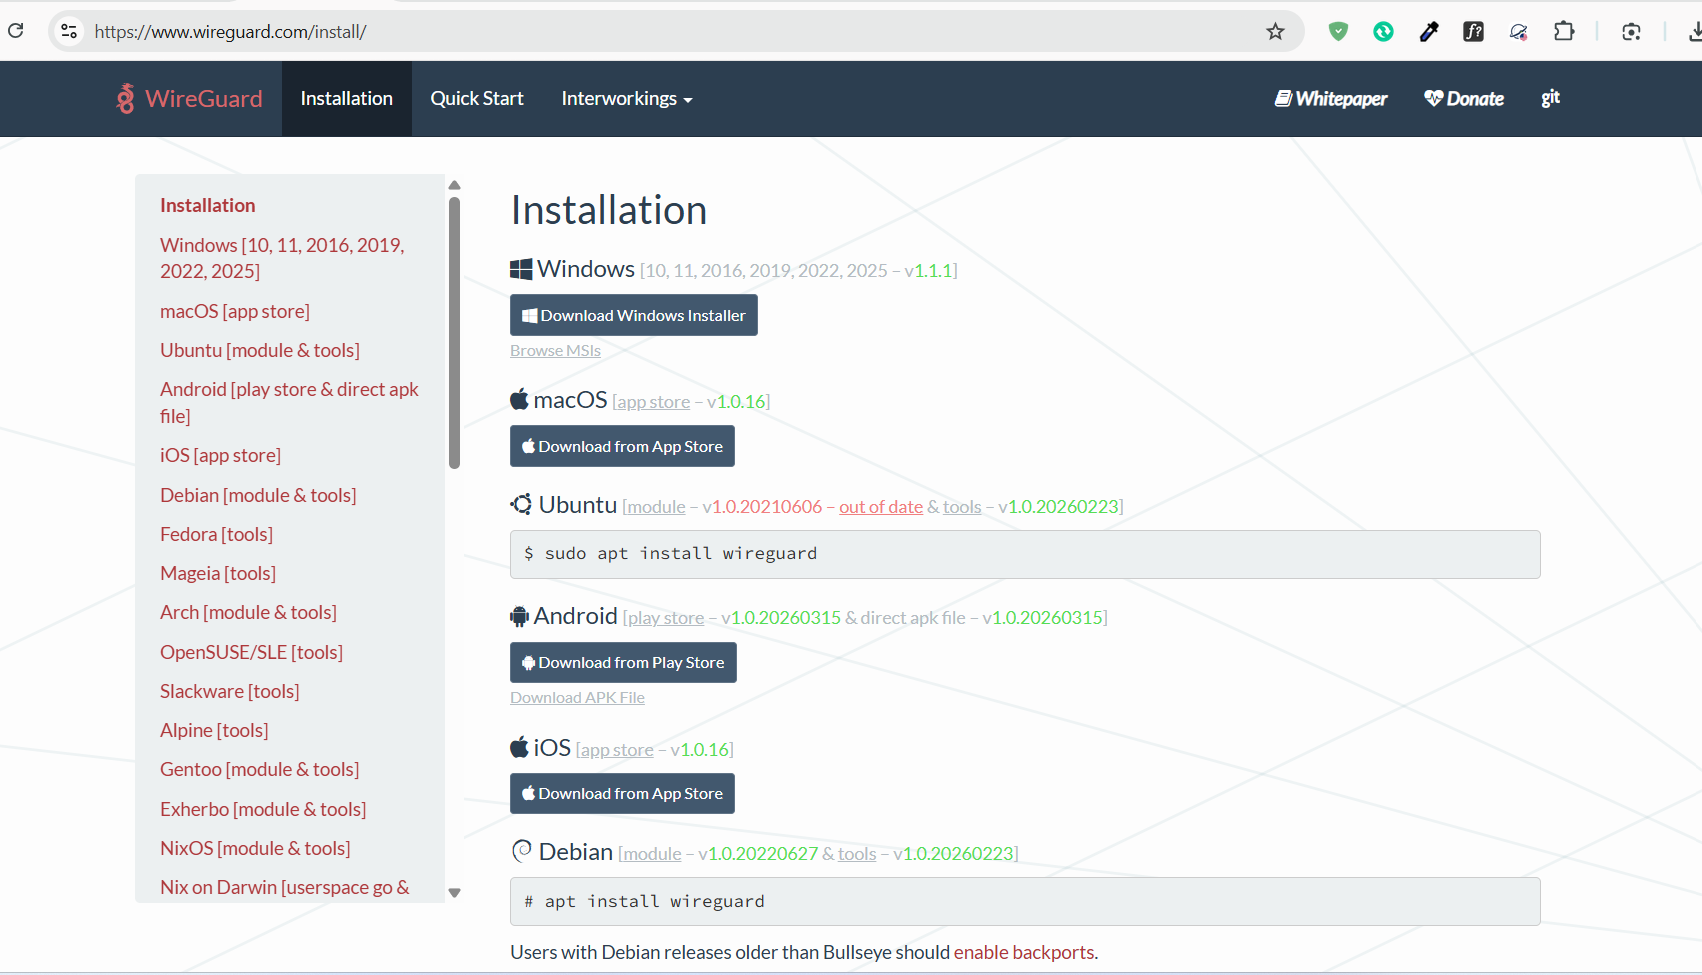
9.1 Install WireGuard for Windows
Download WireGuard from its official website:
Download WireGuard for Windows
Install the application and open it.
9.2 Import the Generated Configuration
In WireGuard, select Import tunnels from file. Browse to the C:\wgcf folder and select wgcf-profile.conf.

You can now inspect the configuration values that wgcf generated. You do not need to activate the tunnel in WireGuard just to inspect the configuration. Avoid connecting the same profile in WireGuard and on your router simultaneously.
9.3 Find the IPv4 Address
Look at the Interface section of the imported WireGuard profile and find the Address entry. It may contain an IPv4 address such as:
172.16.0.2/32This is an example only. Your actual generated address may be different. Copy the IPv4 address, including its prefix, and enter it into the Address field in your TP-Link router’s WireGuard profile, as required by your router interface.
9.4 Find the Allowed IPs
In the Peer section of the WireGuard profile, find the AllowedIPs entry. For a full-tunnel IPv4 configuration, it may look like this:
0.0.0.0/0, ::/0For the IPv4-only setup described in this guide, enter only:
0.0.0.0/0Do not include ::/0 in the router’s IPv4-only Allowed IPs field. Use the values generated in your own profile, and keep the private key, public key, endpoint, and other required settings unchanged.
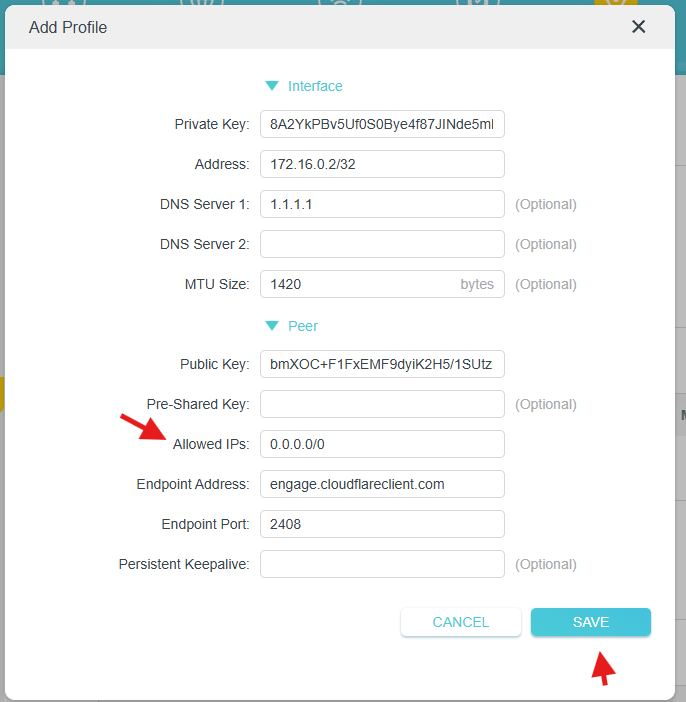
Return to the TP-Link router’s VPN Client settings. Enter the generated IPv4 address and IPv4-only Allowed IPs value in the corresponding fields, as applicable to your router interface. Keep the remaining required values from your generated configuration and click Save.
For model-specific details, read the official TP-Link WireGuard VPN setup guide. The exact workaround depends on your router and firmware. Do not remove settings blindly.
Step 10: Enable Cloudflare WARP and Select Your Devices
Once the profile has been saved successfully, return to the router’s VPN Client page. Find the Cloudflare WARP profile in the Server List and enable it.
Wait for the connection status to change to Connected. The router may briefly show a connecting status before the tunnel becomes active.

Next, open the device list or VPN Access section. Select the devices you want to use Cloudflare WARP. Depending on your router model, you may need to enable VPN access separately for each device.
- Laptop: Use Cloudflare WARP.
- Mobile phone: Use Cloudflare WARP.
- Smart TV: Continue using the regular internet connection.
- Other devices: Choose according to your needs.
Devices that are not assigned to the VPN tunnel will continue using the regular internet connection, provided your router supports this device-selection feature.
Step 11: Test Whether Cloudflare WARP Is Working
After enabling the connection, test it from a device that you selected for VPN access.
Check Cloudflare Trace
Open Cloudflare Trace and look for the warp field in the results. It may show warp=on when the device’s traffic is using WARP.
You can also check your public IP address before and after enabling the VPN. If the setup is working, the public IP shown by the test should generally be associated with Cloudflare’s network rather than your usual ISP connection.
Check Your Internet Connection
Open a few websites and confirm that they load normally. If the router reports a connected status but websites do not load, check the device assignment, DNS settings, and profile compatibility.
Cloudflare WARP encrypts traffic through Cloudflare’s network, but it does not guarantee faster internet speeds or let you select a specific country as your apparent location.
Troubleshooting Common Problems
1. The wgcf Command Does Not Work
Make sure Command Prompt is in the correct folder by running cd C:\wgcf. Check that wgcf.exe is present. If registration or profile generation fails, check the error message and consult the wgcf GitHub repository.
2. The Configuration File Is Missing
After running wgcf generate, check the C:\wgcf folder for wgcf-profile.conf. If the command reports an error, resolve that issue before trying to import the file into your router.
3. TP-Link Shows Invalid Format
Confirm that your router supports WireGuard VPN Client. Then check whether its documentation identifies unsupported IPv6 addresses, IPv6 Allowed IPs, or MTU settings. Use Step 9 to inspect the generated profile and make only the changes required by your router’s documentation.
4. The VPN Shows Connected but Websites Do Not Load
Check that the device is assigned to the VPN profile. Review the router’s VPN status and test Cloudflare Trace. If necessary, temporarily disable the profile to restore your normal internet connection while troubleshooting.
5. Internet Speed Becomes Slower
VPN encryption, router performance, and network routing can affect speed. Compare your connection with the VPN disabled and enabled. WARP may improve routing in some cases, but faster speeds are not guaranteed.
Frequently Asked Questions (FAQ)
Can I use Cloudflare WARP on my TP-Link router without installing an app on every device?
Yes, if your router supports WireGuard VPN Client and accepts the generated profile. You can then select which devices use the VPN tunnel.
Is wgcf an official Cloudflare tool?
No. wgcf is an unofficial open-source utility that generates WireGuard profiles for Cloudflare WARP.
Do I need a paid WARP+ subscription?
Not necessarily. The basic WARP service is available without a paid WARP+ subscription. WARP+ features have separate subscription requirements.
Can I use this method on every TP-Link router?
No. You need a compatible router and firmware that support WireGuard VPN Client. Check the official TP-Link documentation before starting.
What is the difference between VPN Client and VPN Server?
A VPN Client connects your router to an external VPN service. A VPN Server lets remote devices connect to your home or office network. This guide uses VPN Client.
Is it safe to share the generated WireGuard configuration file?
No. The file contains a private key and other sensitive information. Keep it private and do not publish it online.
Will Cloudflare WARP change my IP address to another country?
Not reliably. WARP routes traffic through Cloudflare’s network but is not designed to provide a country-selection feature like some commercial VPN services.
Final Thoughts
Setting up Cloudflare 1.1.1.1 WARP on a compatible TP-Link router lets you route selected devices through Cloudflare without installing a VPN app on every device.
The process involves downloading wgcf.exe, creating the C:\wgcf folder, registering a WARP account, generating wgcf-profile.conf, importing the profile into the TP-Link VPN Client, and testing the connection.
If you receive an Invalid format error, inspect the profile with WireGuard and enter compatible IPv4 settings as required by your router.
The most important requirement is router compatibility. Check your exact TP-Link model and firmware before starting, and keep your generated configuration files private.
For further information, visit the wgcf GitHub repository, the official WireGuard download page, and the TP-Link WireGuard VPN setup guide.